


How to Install Minecraft Mods
Posted by: Ralph van den Berg (15 May, 2013)
Minecraft is a wonderful open world sandbox game with a ton of freedom to do whatever you want. On top of all that, the game can be modified, or modded, to add to, remove from, or change the way the game looks or behaves. We'll look into how to install various kinds of mods for Minecraft on Windows. Remember to close Minecraft and back up your worlds before installing any new mods.
Open the Minecraft installation directory. To find it, press the Windows key on your keyboard or click the start button on the taskbar and type "%appdata%" (without the quotes) and hit enter. This should open up an explorer window and you'll find a folder called .minecraft (including that dot) near to or at the top. Remember that bit because for modding Minecraft you'll be going in there a lot. In there is a folder called "saves". Your worlds are in there. You can either copy the entire "saves" folder to a safe location, or go inside it and back up individual worlds.
There are some mod packs that are pretty popular such as Technic (Tekkit), Yogbox or Feed the Beast and the fun part of those is that you just download their designated launcher and it will take care of the rest for you. Currently, modding Minecraft is a bit of a messy business as we'll see later in the article, but these launchers with mod packs get rid of all the fuss. All you need to do is download the launcher exe file and run it. After choosing your mod pack (in launchers that support multiple packs or customizable packs) it will download and install the mods automatically. Another benefit is that it doesn't affect your default Minecraft installation, it's like installing a new game.
Check out:
- technic pack
- feed the beast
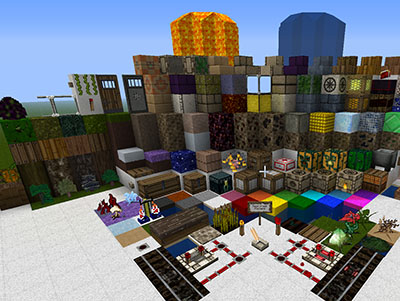
Texture packs are very simple mods that change the appearance of the game. Standard texture packs are also very easy to install, because they are in the same resolution as the default Minecraft texture- 16x16. Any higher and it's considered a high resolution,or HD, texture pack and will require a special mod to handle, for example Optifine which will be discussed in the next bit. Besides that, to install a texture pack, find one online and download it. It'll be a zip file, don't worry about unzipping it. Browse to your Minecraft installation folder ("%appdata%" and then .minecraft), and inside find a folder called texturepacks and move your downloaded zip file into it. That's it for standard resolution texture packs. Just launch the game now and pick your texture pack from the menu.
If you're using one of the Mod Packs mentioned earlier, you need to go into their respective installation folders instead of the .minecraft folder to add texture packs. You will need to do some extra searching to make sure your texture pack is compatible with the mods.
Most simple mods require a bit of dirty work, but it's still simple enough to do even for beginners. Download your mod, it should be a zip file, and keep it somewhere else on your computer temporarily and use a program such as 7-Zip to "open archive". Leave it like that for now. Open your Minecraft installation folder ("%appdata%" and then .minecraft) and open the folder called "bin". There will be a few Java files in there. Find the one called minecraft.jar and open it with a program such as 7-Zip (Right-click, 7-Zip, Open Archive), it will open up just like a zip file. Now from your mod zip archive that you opened earlier, select all the contents and drag them into the minecraft.jar archive. Lastly, delete the folder called META-INF in the minecraft.jar archive and then close it up. Now launch the game and see if it worked. This is also how you install Optifine which you need for high definition texture packs. There are other solutions for supporting HD textures, but Optifine is the one I prefer.
In case of failure when trying the install mods, which is not unusual, you can reset your Minecraft installation by choosing to force update in the Minecraft launcher.
There are mods that supposedly make installing subsequent mods easier. Usually, installing the Mod Loader is the same process as the previous "simple mod installation", but from then on, you can use its graphic interface to install subsequent mods. Read up beforehand to see which mods are compatible with the Mod Loader you choose.
This guide should help you get started with modding Minecraft. Remember, the more mods you install at once, the less stable the game becomes. Not all mods work well together. If you have questions or comments, they are very welcome in the comments below.
Â
Back up your worlds
Open the Minecraft installation directory. To find it, press the Windows key on your keyboard or click the start button on the taskbar and type "%appdata%" (without the quotes) and hit enter. This should open up an explorer window and you'll find a folder called .minecraft (including that dot) near to or at the top. Remember that bit because for modding Minecraft you'll be going in there a lot. In there is a folder called "saves". Your worlds are in there. You can either copy the entire "saves" folder to a safe location, or go inside it and back up individual worlds.
Mod packs
There are some mod packs that are pretty popular such as Technic (Tekkit), Yogbox or Feed the Beast and the fun part of those is that you just download their designated launcher and it will take care of the rest for you. Currently, modding Minecraft is a bit of a messy business as we'll see later in the article, but these launchers with mod packs get rid of all the fuss. All you need to do is download the launcher exe file and run it. After choosing your mod pack (in launchers that support multiple packs or customizable packs) it will download and install the mods automatically. Another benefit is that it doesn't affect your default Minecraft installation, it's like installing a new game.
Check out:
- technic pack
- feed the beast
Texture Packs
Texture packs are very simple mods that change the appearance of the game. Standard texture packs are also very easy to install, because they are in the same resolution as the default Minecraft texture- 16x16. Any higher and it's considered a high resolution,or HD, texture pack and will require a special mod to handle, for example Optifine which will be discussed in the next bit. Besides that, to install a texture pack, find one online and download it. It'll be a zip file, don't worry about unzipping it. Browse to your Minecraft installation folder ("%appdata%" and then .minecraft), and inside find a folder called texturepacks and move your downloaded zip file into it. That's it for standard resolution texture packs. Just launch the game now and pick your texture pack from the menu.
If you're using one of the Mod Packs mentioned earlier, you need to go into their respective installation folders instead of the .minecraft folder to add texture packs. You will need to do some extra searching to make sure your texture pack is compatible with the mods.
Simple Mod Installation
Most simple mods require a bit of dirty work, but it's still simple enough to do even for beginners. Download your mod, it should be a zip file, and keep it somewhere else on your computer temporarily and use a program such as 7-Zip to "open archive". Leave it like that for now. Open your Minecraft installation folder ("%appdata%" and then .minecraft) and open the folder called "bin". There will be a few Java files in there. Find the one called minecraft.jar and open it with a program such as 7-Zip (Right-click, 7-Zip, Open Archive), it will open up just like a zip file. Now from your mod zip archive that you opened earlier, select all the contents and drag them into the minecraft.jar archive. Lastly, delete the folder called META-INF in the minecraft.jar archive and then close it up. Now launch the game and see if it worked. This is also how you install Optifine which you need for high definition texture packs. There are other solutions for supporting HD textures, but Optifine is the one I prefer.
In case of failure when trying the install mods, which is not unusual, you can reset your Minecraft installation by choosing to force update in the Minecraft launcher.
Using a Mod Loader
There are mods that supposedly make installing subsequent mods easier. Usually, installing the Mod Loader is the same process as the previous "simple mod installation", but from then on, you can use its graphic interface to install subsequent mods. Read up beforehand to see which mods are compatible with the Mod Loader you choose.
This guide should help you get started with modding Minecraft. Remember, the more mods you install at once, the less stable the game becomes. Not all mods work well together. If you have questions or comments, they are very welcome in the comments below.
Â


< Please log in or register to post comments >
Next Rambling »
QR Code Performance Tracking« Previous Rambling
HOW TO TICK PEOPLE OFFRelated Ramblings
- How to Manage and Clear Up Space in Dropboxposted by Ralph van den Berg
on 27 Mar, 2015 - Installing Sonic Ether's Shaders Mod for Minecraft (Tutorial)posted by Ralph van den Berg
on 28 Jul, 2014 - QR Code Performance Trackingposted by Ralph van den Berg
on 7 Jun, 2013 - Tutorial on how to record Minecraft gameplay videosposted by Ralph van den Berg
on 28 Oct, 2011 - HDR - creating overly realistic photo effectsposted by Ralph van den Berg
on 16 Feb, 2010 - New kind of Tetrisposted by Nathalie van den Berg
on 11 Nov, 2009 - Old Games Not Deadposted by Ralph van den Berg
on 31 May, 2009 - Chernobyl War Zoneposted by Ralph van den Berg
on 13 May, 2009 - Play Adlibs!posted by Ralph van den Berg
on 1 Jun, 2008 - Rouletteposted by Ralph van den Berg
on 19 Mar, 2008
Recent Activity
4 May, 2017: Aziz Das
commented on Hitting the Right Notes
"Are you looking for something like how to increase spotify follower. Spotify followers is now one of the biggest way to increase any other kind of follower[...]"
commented on Hitting the Right Notes
"Are you looking for something like how to increase spotify follower. Spotify followers is now one of the biggest way to increase any other kind of follower[...]"
26 Apr, 2017: Aziz Das
commented on Hitting the Right Notes
"Are you looking for one of the best app rating website for increasing your app reviews & rating than i will recommend you that https://www.behance.net/port[...]"
commented on Hitting the Right Notes
"Are you looking for one of the best app rating website for increasing your app reviews & rating than i will recommend you that https://www.behance.net/port[...]"
18 Apr, 2017: Aziz Das
commented on Hitting the Right Notes
"Now music is a great opportunity to everyone because today every man listen any type of music for spend funny time and also I have founded that there are m[...]"
commented on Hitting the Right Notes
"Now music is a great opportunity to everyone because today every man listen any type of music for spend funny time and also I have founded that there are m[...]"
30 Mar, 2017: Aziz Das
commented on Hitting the Right Notes
"Now million of people are using android a smart phone and in order to demand to everyone many android developer want to know about how to increase android [...]"
commented on Hitting the Right Notes
"Now million of people are using android a smart phone and in order to demand to everyone many android developer want to know about how to increase android [...]"
External Links
RalphvandenBerg.com [version.3]
Copyright © 2008 - 2024
Website by Ralph van den Berg
All rights reserved
Sitemap
contact me
Copyright © 2008 - 2024
Website by Ralph van den Berg
All rights reserved
Sitemap
contact me