HDR - creating overly realistic photo effects
Posted by: Ralph van den Berg (16 February, 2010)
HDR stands for High Dynamic Range and it's a photo effect traditionally accomplished by taking multiple photographs at different camera settings and processing them into a single picture. The resulting image has a feel to it that makes it more realistic or surrealistic. The brights are brighter, the darks are darker and the level of detail is noticeably high.
Actually trying to achieve this effect in the traditional manner can be difficult and time consuming. Luckily for us, there's a way to take a shortcut to fake the HDR effect. You only need a single photograph is JPEG and Photoshop. Check out the before and after pictures below for a preview of what you can do.

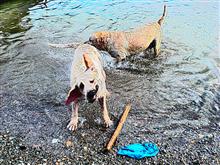

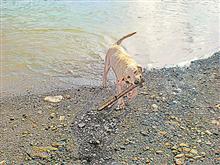
(click on a picture for the larger version)
As you can see, it's one way to add "something" to the picture. Let's get started. Open up your JPEG in photoshop.
So I hope this was a helpful little tutorial. If you want to see a spastic video tutorial, the one I first used, then check out the link below. If you have questions or other tips, please let us know in the comments below.
[www.str8photography.com]
Actually trying to achieve this effect in the traditional manner can be difficult and time consuming. Luckily for us, there's a way to take a shortcut to fake the HDR effect. You only need a single photograph is JPEG and Photoshop. Check out the before and after pictures below for a preview of what you can do.


(click on a picture for the larger version)
- Set up- you probably need to unlock your layer. Right-click on your layer and choose layer from background. Now change the image » mode to Lab color, the effects we are trying to perform only work in lab color mode because of the highlights/shadows that we will manipulate. To keep from destroying our image, right-click it and convert to smart object.
- Adjustments- now under image » adjustments you'll see only one option: Shadows/Highlights, pick it and make sure you are viewing with "more options". Now here you actually just have to play around with the sliders, but what I usually start off doing is Shadows- amount to 100%, Highlights- amount to 100%, Adjustments- color correction to 0, and Adjustments- Midtone contrast to +100. At this point your image probably looks like crap, show slide some of the other sliders around and try to get close to something you like. It's OK if you don't get it perfectly right the first time, because you can always come back to this step.
- Curves- yes this step also requires some fiddling, but I can give you some nice guidelines. The first curve is the "lightness" curve. You barely need to adjust this into a bit more of a 'S' shape. Just make some slight adjustments and see what looks good. Next, we edit curves 'a' and 'b'. Do the following to both of them: Grab the lower left end of the line and drag it one grid space to the right. Now grab the top right end of the line and drag it one grid to the left. Basically you've just increased the slope twofold. After you've done this to both curves, you can take the center of the 'b' line and drag it a tiny bit to the left to add some yellow color, or warmth, to the picture. Once again, don't worry too much about what you're doing, because you can come back to this step later.
- High pass- finally to get the high detail effect, we run a filter » other » High pass. Adjust the slider a bit. The preview shows you how well defined your edges and details will be. Apply this filter and then go to the blending options and set it to Linear light. Voila, this is your image. Like I said before, you can go back and forth between steps 2, 3, and 4 until you get the desired effect.
So I hope this was a helpful little tutorial. If you want to see a spastic video tutorial, the one I first used, then check out the link below. If you have questions or other tips, please let us know in the comments below.
[www.str8photography.com]


Comment by Ralph van den Berg
Posted on 16 February, 2010Just noting: when I'm starting off with some of these settings maxed out, it's because I'm going for maximum effect. Naturally you should adjust these also if you're not getting the results you are looking for. With HDR you can go for a completely surreal effect or a slight "touch up" effect. It's all up to you. Play around and see what you like better.
Comment by Marion Jude
Posted on 16 February, 2010Interesting choice of words: "overly realistic". I do suppose it gives you a new perspective on an otherwise flat image. It's a cool effect.
< Please log in or register to post comments >

Next Rambling »
Windows 7 Black Shark Wallpaper« Previous Rambling
A Little Bit of Real LifeRelated Ramblings
- How to Manage and Clear Up Space in Dropboxposted by Ralph van den Berg
on 27 Mar, 2015 - Installing Sonic Ether's Shaders Mod for Minecraft (Tutorial)posted by Ralph van den Berg
on 28 Jul, 2014 - QR Code Performance Trackingposted by Ralph van den Berg
on 7 Jun, 2013 - How to Install Minecraft Modsposted by Ralph van den Berg
on 15 May, 2013 - Tutorial on how to record Minecraft gameplay videosposted by Ralph van den Berg
on 28 Oct, 2011
Recent Activity
4 May, 2017: Aziz Das
commented on Hitting the Right Notes
"Are you looking for something like how to increase spotify follower. Spotify followers is now one of the biggest way to increase any other kind of follower[...]"
commented on Hitting the Right Notes
"Are you looking for something like how to increase spotify follower. Spotify followers is now one of the biggest way to increase any other kind of follower[...]"
26 Apr, 2017: Aziz Das
commented on Hitting the Right Notes
"Are you looking for one of the best app rating website for increasing your app reviews & rating than i will recommend you that https://www.behance.net/port[...]"
commented on Hitting the Right Notes
"Are you looking for one of the best app rating website for increasing your app reviews & rating than i will recommend you that https://www.behance.net/port[...]"
18 Apr, 2017: Aziz Das
commented on Hitting the Right Notes
"Now music is a great opportunity to everyone because today every man listen any type of music for spend funny time and also I have founded that there are m[...]"
commented on Hitting the Right Notes
"Now music is a great opportunity to everyone because today every man listen any type of music for spend funny time and also I have founded that there are m[...]"
30 Mar, 2017: Aziz Das
commented on Hitting the Right Notes
"Now million of people are using android a smart phone and in order to demand to everyone many android developer want to know about how to increase android [...]"
commented on Hitting the Right Notes
"Now million of people are using android a smart phone and in order to demand to everyone many android developer want to know about how to increase android [...]"
External Links
RalphvandenBerg.com [version.3]
Copyright © 2008 - 2026
Website by Ralph van den Berg
All rights reserved
Sitemap
contact me
Copyright © 2008 - 2026
Website by Ralph van den Berg
All rights reserved
Sitemap
contact me


